How does Gmail’s SMTP server work?
The Gmail SMTP server is Google’s SMTP. It allows users to send email through their Gmail accounts using third-party applications.
It’s also 100% free to use (with limitations) and integrates with popular email clients, including Outlook, Thunderbird, and Apple Mail. So exactly how does it work?
1. Connection Setup
First, your application or email client connects to the Gmail SMTP server using the hostname smtp.gmail.com. Establishing this connection is the first step in sending email through Gmail’s servers.
2. Port Selection
Next, the server needs to connect to an SMTP port. Choosing the correct Gmail SMTP port settings is super important because it acts as the endpoint for transmitting email data. Gmail supports two primary ports for SMTP connections:
- Port 587 (TLS): Ideal for more secure email sending because it uses Transport Layer Security (TLS) encryption.
- Port 465 (SSL): Works with older email clients that rely on Secure Sockets Layer (SSL) encryption, which is now largely deprecated in favor of TLS.
3. Authentication
Gmail requires users to authenticate before sending emails. This means entering your Gmail address and an App Password (if two-factor authentication is enabled) or your regular Gmail password (if two-factor authentication is not set up).
4. Email Composition and Submission
Once authenticated, your app or client formats the email message according to SMTP standards, including sender, recipient, subject, and body content. The email is sent to the Gmail SMTP server.
5. Email Transmission:
The Gmail SMTP server relays the message to the recipient’s email server using the internet’s mail exchange system. If the recipient’s server is unavailable, Gmail will attempt to resend the message for a period before returning a failure notice.
6. Rate Limits and Restrictions
Anybody using the Google SMTP server should know the rate limits and restrictions to avoid lockouts. The current Gmail SMTP sending limits are 500 emails per day for free Gmail accounts or 2,000 emails per day for Google Workspace accounts.
Exceeding these limits can result in temporary suspension (up to 24 hours) of SMTP and Gmail access.
7. Error Handling and Delivery Reports
If an email cannot be delivered, Gmail generates a bounce-back message detailing the reason for the failure, such as incorrect recipient addresses or server issues.
What’s SMTP relay and do you need it?
SMTP Relay is a Google Workspace service that lets your apps or servers send emails through Google’s mail servers, like smtp-relay.gmail.com, instead of directly to recipients.
It’s built for businesses needing to send bulk or transactional emails without clogging their own domain. Here’s why it matters and whether you need it:
1. Boosts email deliverability
Staying up to date with how you can boost email deliverability rates is one way to increase your campaign performance. Because Gmail SMTP Relay uses Google’s trusted servers to send your emails, this is one way to cut the odds of hitting the spam filters.
For marketers sending newsletters or sales reps pushing pitches, this means more messages land in inboxes, not junk folders. It also uses TLS encryption for security and supports SPF, DKIM, and DMARC to prove your emails are legit— all important factors to protect your domain’s reputation.
2. Higher sending limits
Unlike Gmail’s SMTP Server, capped at 500 emails daily (2,000 with Workspace), SMTP Relay handles up to 10,000 emails daily across your domain.
That’s a game-changer for big campaigns or companies who manage larger email newsletter lists. You won’t get locked out mid-send like with the standard SMTP server, giving you some power to scale outreach efforts without headaches.
3. Keeps internal communications separate
Businesses love using SMTP Relay because it separates external bulk or transactional emails from internal communications. Not only does this protect your domain as we’ve mentioned, but it keeps internal emails and conversations more secure.
What’s the deal with the restricted Gmail SMTP server?
The restricted Gmail SMTP Server is a special setup for Google Workspace users that limits email sending to only Gmail or Workspace addresses. It’s not for everyone—here’s the breakdown of how it works.
Think of it as a locked-down version of Gmail’s SMTP Server (smtp.gmail.com). Normally, you can send emails to any address including recipients at external domains.
The restricted server shuts that down. Once you turn this feature on and it’s active, only go to people using Gmail (e.g., friend@gmail.com) or your company’s Workspace domain (e.g., you@yourcompany.com).
But why bother? Some businesses need an internal communication system for team updates or replies to staff. This server can do exactly that.
It’s built for internal use to keep your company’s email flow tight and secure. Google still encrypts it with TLS or SSL, so it’s as safe as the regular SMTP server and you won’t have to worry about security issues.
Gmail SMTP vs POP3 vs IMAP – what’s the difference?
In short, your Gmail incoming and outgoing server settings split the work: Gmail SMTP handles sending emails, while POP3 and IMAP take care of receiving and storing them.
The real difference between POP3 and IMAP is how they manage your email inbox.
POP3 operates as a down download-and-delete protocol. When you set it up with Gmail, it connects to the pop.gmail.com server, downloads new emails to your device, and then deletes it from the server. You can work offline because POP3 provides full offline email access but those emails won’t show up elsewhere on other devices unless you download them again with internet access.
If you want to keep emails on the server, Google has a workaround for Gmail users. Go to the “Forwarding and POP/IMAP” settings page and turn off “Delete Gmail’s copy” or “Archive Gmail’s copy.” Click “Save changes” and proceed.
IMAP works a little differently in this regard. Instead of downloading messages and then removing them from the server, IMAP keeps them on the server and syncs everything two ways via imap.gmail.com. For example, if you read an email on your email client’s mobile app, it’ll also display as read in your web browser.
The concern for IMAP users is storage. Since it keeps everything, it uses server storage to do so. That means if your Google account runs out of storage space, you could stop receiving new emails until there’s more space on the server.
With this in mind, here is how Gmail SMTP, POP3, and IMAP stack up:
| Feature |
SMTP |
POP3 |
IMAP |
| Purpose |
Sending outgoing emails |
Retrieving and downloading emails |
Synchronizing emails across multiple devices |
| Server Storage |
Does not store emails |
Deletes emails by default (optional retention) |
Stores emails permanently on the server |
| Multi-Device Sync |
N/A |
Limited (local storage unless configured) |
Excellent (full synchronization across devices) |
| Offline Access |
Sent folder only |
Full offline access |
Partial offline access (unless cached) |
| Ports (Gmail) |
587 (TLS), 465 (SSL) |
995 (SSL) |
993 (SSL) |
How do you set up POP3 in Gmail?
Here’s how to set up POP3 in Gmail, step by step.
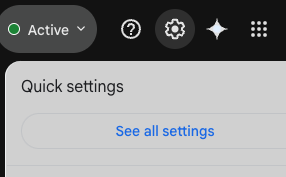
1. First, you should log into Gmail in your web browser and click the gear icon in the top right corner of the screen. From there, select “See all settings.”
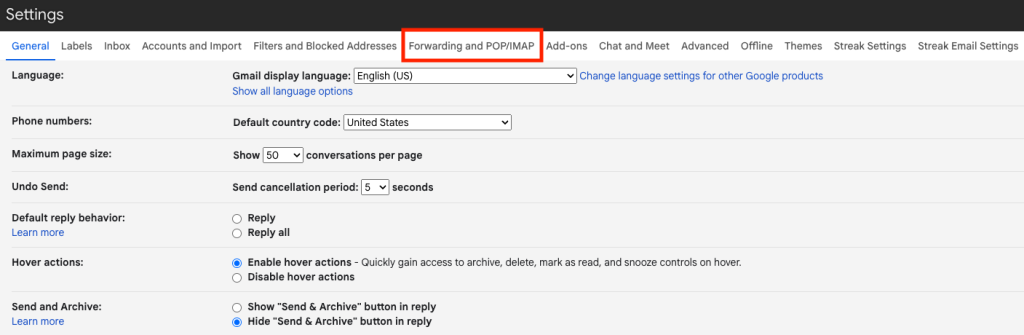
2. Then, click the “Forwarding and POP/IMAP” tab to view POP3 and IMAP settings.
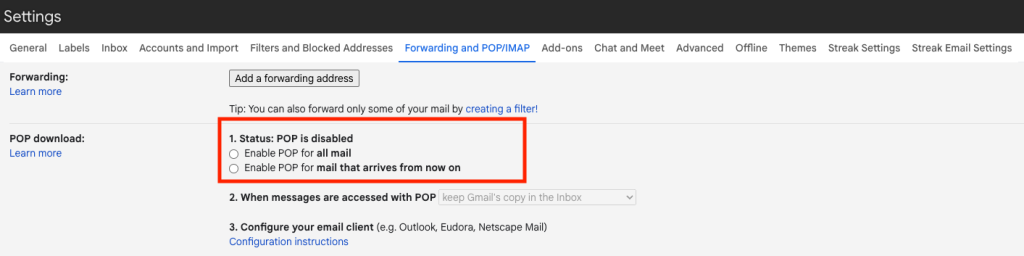
3. Look for the “POP Download” section, choose “Enable POP for all mail” (everything) or “Enable POP for mail that arrives from now on” (new stuff only), then hit Save Changes.
4. Next, you should log in to your preferred third-party app or email client. Once you do, find the POP/Incoming mail message server settings and enter the following details:
- Incoming Mail Server (POP): pop.gmail.com
- Requires SSL: yes
- Port: 995
- Display Name: your name
- Username: your Gmail account (name@gmail.com)
- Password: your Gmail password
- Server timeouts: more than 1 minute (5 minutes is recommended)
5. Click continue and allow your Gmail account to sync with the app.
How do you set up IMAP in Gmail?
To set up IMAP in Gmail, you’ll follow similar steps as we did with POP3.
1. Repeat the same first two steps by logging into your Gmail account and locating the account settings page.
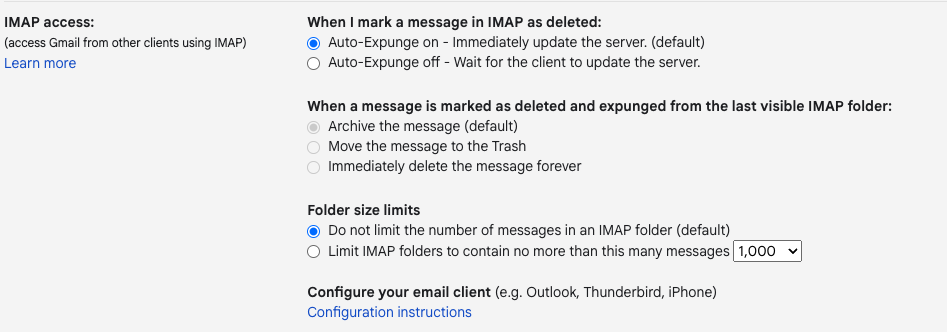
2. In the IMAP access section, you can view default settings. If you select “Auto-Expunge on,” “Archive the message” is auto-selected. You can also choose your preferred folder size limits.
3. After adjusting your settings, you can enable IMAP by logging into your third-party email client. The supported options for “Sign in with Google” users include Outlook, iPhone, Thunderbird, and Apple Mail.
4. Once you log in to your email app, enter the following details in the Incoming mail message server/IMAP section:
- Incoming Mail Server (IMAP): imap.gmail.com
- Display Name: your name
- Username: your Gmail account (name@gmail.com)
- Password: your Gmail password
- Requires SSL: Yes
- Port: 993
Stuck? How to fix Gmail SMTP server issues
Even though the configuration of SMTP settings for Gmail seems easy, it’s possible to run into some issues. I decided to see what the most common issues are that users ask for help with and cover how to fix them in detail. Below are the three most common and their fixes.
Authentication Errors
Users commonly report issues with their username and password. Error code 535-5.7.8 (username and password not accepted) occurs when Gmail rejects your login details. It’s a security block to stop unauthorized access.
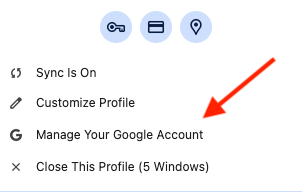
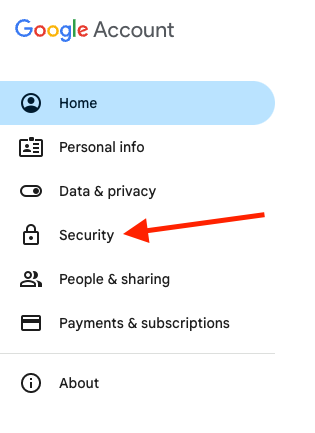
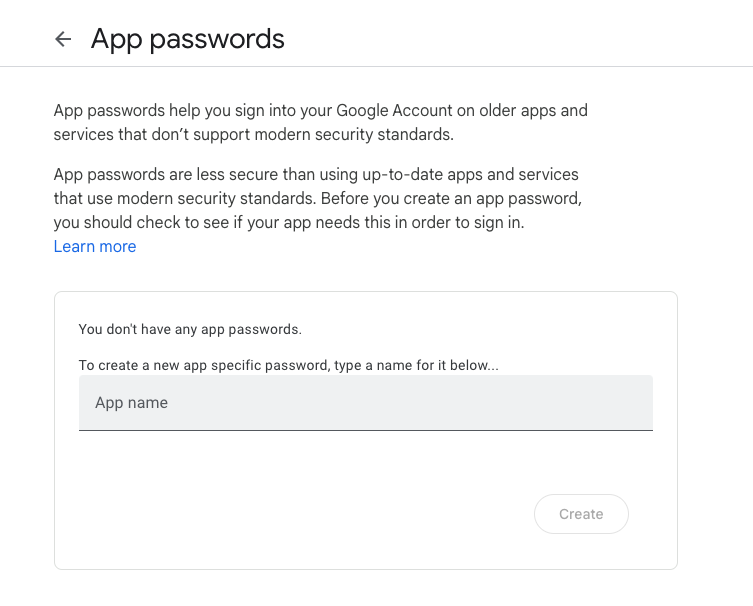
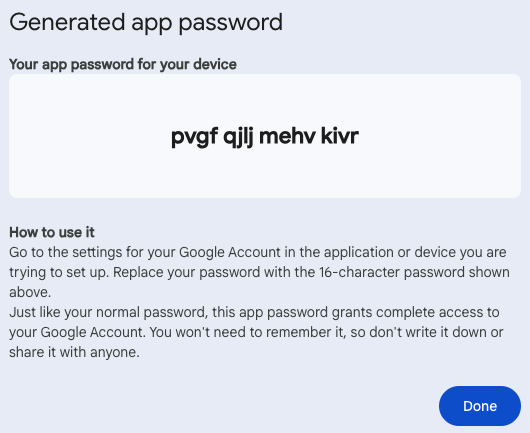
First, check your username and make sure everything is correct. If it looks good, you’ll need to generate an app password to gain access.
Go to Google Account > Security > App passwords and generate a 16-character code for “Mail.” You can now use that code instead of your regular password to log in to your third-party email client to bypass this error code.
Connection Timeouts
If you are experiencing connection timeouts, it’s usually an error code: 421-4.7.0 (Temporary failure, try again later). This happens when your app can’t reach smtp.gmail.com, often due to network issues or Gmail throttling your sends after too many attempts.
To solve this, test your internet connection. A weak Wi-Fi signal or firewalls can block port 587 or 465. Try switching ports in your Gmail SMTP port settings if one fails. Then, wait 5-10 minutes before trying again.
Afterward, you can send a test email to see if it’s working. If the problem persists, check Gmail’s status page for outages.
Network Access Denied
If you see the error code 550-5.7.0 (Email relay denied), this means Gmail is blocking your attempt to send emails because the IP or domain in your app isn’t registered with your Workspace account.
For example, if you’re sending from you@company.com via smtp.gmail.com, but your Workspace only knows you@gmail.com, it denies the relay because Google sees it as unverified.
To fix this, log into your Workspace Admin console (admin.google.com) as an admin. Go to Apps > Google Workspace > Gmail > SMTP Relay Service, and add your sending device’s IP address under “Allowed senders.”
Save, then test a send with smtp.gmail.com, port 587. If it works, your IP’s cleared. If not, you need to match your email domain to your Workspace setup.
All in all, when mail gets stuck in the outbox, it’s almost always the outgoing server settings for Gmail being off somewhere — wrong port, missing TLS, or an old password the app is still clinging to.






![The Ultimate Email Deliverability Toolset for 2026 [15+ Tools]](https://test.reply.io/wp-content/uploads/deliverability-300x158.jpg "The Ultimate Email Deliverability Toolset for 2026 [15+ Tools]")